The BIDScoin workflow
With a sufficiently organized source data folder, the data conversion to BIDS can be performed by running the (1a) the bidsmapper, (1b) the bidseditor and (2) the bidscoiner command-line tools. The bidsmapper uses a so-called template bidsmap to automatically build up a list of the different data types in your study (i.e. to do data discovery), and to make educated guesses of how exactly they should be converted (“coined”) to BIDS. This provisional information is stored in what is called a study bidsmap. The bidseditor reads the study bidsmap and presents a GUI to the user to make corrections or to add information that is otherwise not available. Finally, the bidscoiner uses the settings and mappings of the study bidsmap to fully automatically perform the actual conversion of the source data to BIDS.
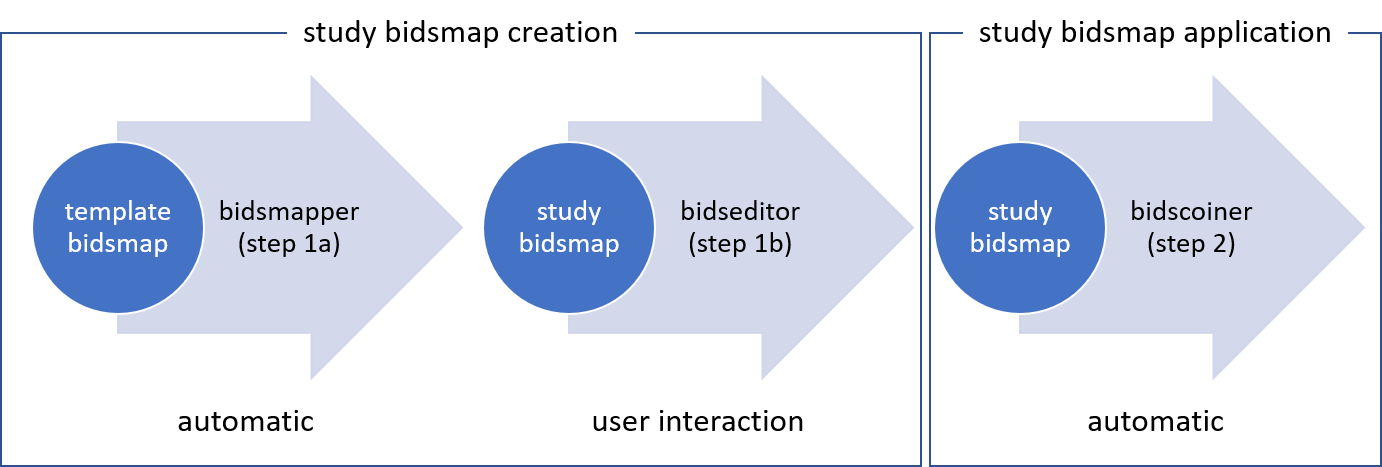
Creation and application of a study bidsmap
By default, when finished the bidsmapper automatically launches the bidseditor, so in its simplest form, all you need to do to convert your raw source data into BIDS is to run two simple shell commands, e.g.:
$ bidsmapper sourcefolder bidsfolder    # Scans your data and creates a study bidsmap
$ bidscoiner sourcefolder bidsfolder    # Converts your data to BIDS using the study bidsmap
If you add new subjects all you need to do is re-run the bidscoiner – unless the scan protocol was changed, then you also need to first re-run the bidsmapper to add the new samples to the study bidsmap. The figure and paragraphs below describe the BIDScoin workflow in more detail.
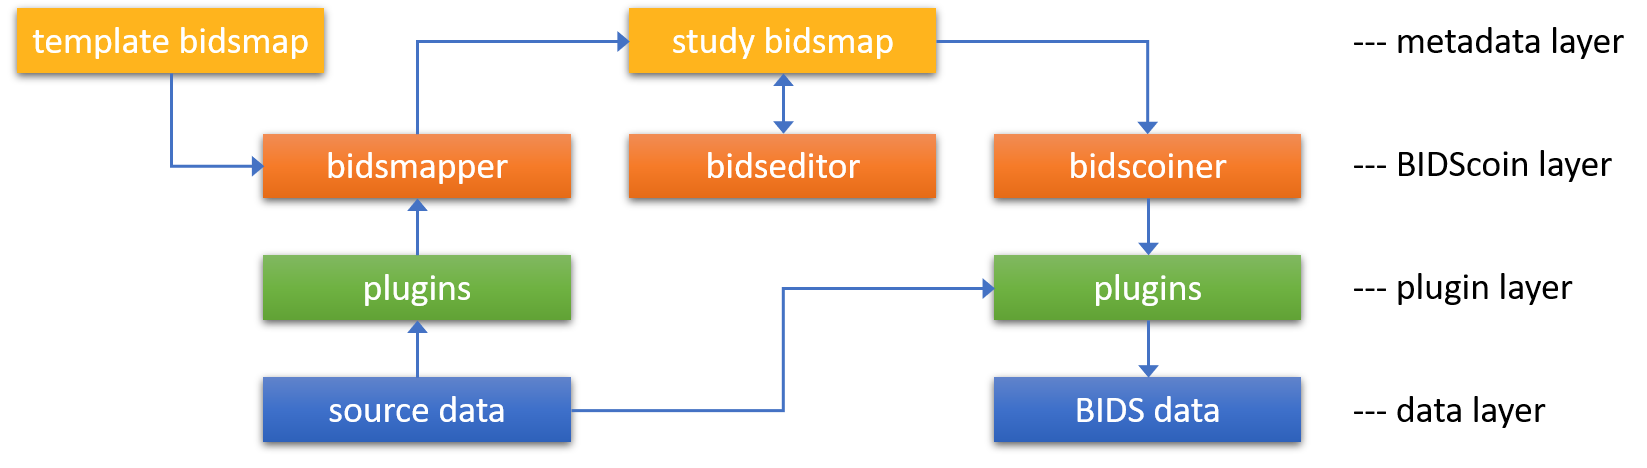
The BIDScoin architecture and dataflow, showing how the bidsmapper performs data discovery to produce a study bidsmap, which the user can modify using a GUI. The bidscoiner then has all the info it needs to perform the data conversion.
Tip
If you don’t know what shell command to use or what to do, run the bidscoin command to give you a workflow overview
Step 1a: Running the bidsmapper
The bidsmapper scans your source data repository to identify different data types by matching them against the run-items in the template bidsmap. Once a match is found, a mapping to BIDS output data types is made and the run-item is added to the study bidsmap. You can check and edit these generated bids-mappings to your needs with the (automatically launched) bidseditor. Re-run the bidsmapper whenever something was changed in your data acquisition protocol and edit the new data type to your needs (your existing bidsmap will be reused).
The bidsmapper uses plugins, as stored in the ‘Options’ section of the bidsmap, to perform its task and deal with different data modalities and formats.
Here is how to run the bidsmapper command:
usage: bidsmapper [-h] [-b NAME] [-t NAME] [-p NAME [NAME ...]] [-n PREFIX] [-m PREFIX] [-u PATTERN]
                  [-s] [-a] [-f] [--no-update]
                  sourcefolder bidsfolder

positional arguments:
  sourcefolder          The study root folder containing the raw source data folders
  bidsfolder            The destination folder with the (future) bids data and the
                        bidsfolder/code/bidscoin/bidsmap.yaml output file
More details…
- options:
- -h, --help
show this help message and exit
- -b, --bidsmap NAME
The study bidsmap file with the mapping heuristics. If the bidsmap filename is just the base name (i.e. no ‘/’ in the name) then it is assumed to be located in the current directory or in bidsfolder/code/bidscoin. Default: bidsmap.yaml
- -t, --template NAME
The bidsmap template file with the default heuristics (this could be provided by your institute). If the bidsmap filename is just the base name (i.e. no ‘/’ in the name) then it is assumed to be located in the bidscoin config folder. Default: bidsmap_dccn
- -p, –plugins NAME [NAME …]
List of plugins to be used. Default: the plugin list of the study/template bidsmap
- -n, --subprefix PREFIX
The prefix common for all the source subject-folders (e.g. ‘Pt’ is the subprefix if subject folders are named ‘Pt018’, ‘Pt019’, …). Use ‘*’ when your subject folders do not have a prefix. Default: the value of the study/template bidsmap, e.g. ‘sub-’
- -m, --sesprefix PREFIX
The prefix common for all the source session-folders (e.g. ‘M_’ is the subprefix if session folders are named ‘M_pre’, ‘M_post’, ..). Use ‘*’ when your session folders do not have a prefix. Default: the value of the study/template bidsmap, e.g. ‘ses-’
- -u, --unzip PATTERN
Wildcard pattern to unpack tarball/zip-files in the sub/ses sourcefolder that need to be unzipped (in a tempdir) to make the data readable. Default: the value of the study/template bidsmap
- -s, --store
Store newly discovered data samples in the bidsfolder/code/provenance folder (useful for editing e.g. zipped or DICOMDIR datasets)
- -a, --automated
Save the automatically generated bidsmap to disk and without interactively tweaking it with the bidseditor
- -f, --force
Discard the previously saved bidsmap and log file, instead of reusing them (use this option for a fresh start)
- --no-update
Do not update any sub-/ses-prefixes in or prepend the sourcefolder name to the <<filepath:regex>> expression that extracts the subject/session labels. This is normally done to make the extraction more robust, but could cause problems for certain use cases
examples:
  bidsmapper myproject/raw myproject/bids
  bidsmapper myproject/raw myproject/bids -t bidsmap_custom  # Uses a template bidsmap of choice
  bidsmapper myproject/raw myproject/bids -p nibabel2bids    # Uses a plugin of choice
  bidsmapper myproject/raw myproject/bids -n patient- -m '*' # Handles DICOMDIR datasets
  bidsmapper myproject/raw myproject/bids -u '*.tar.gz'      # Unzip tarball source files
After the source data has been scanned, the bidsmapper will automatically launch step 1b to let the user check and edit the automatically generated study bidsmap. For a fully automated workflow users can skip this interactive step using the -i option (see above).
Tip
The default template bidsmap (-t bidsmap_dccn) is customized for acquisitions at the DCCN. If this bidsmap is not working well for you, consider adapting it to your needs so that the bidsmapper can recognize more of your scans and automatically map them to BIDS the way you prefer.
Step 1b: Running the bidseditor
This application launches a graphical user interface for editing the bidsmap that is produced by the bidsmapper. You can edit the BIDS data types and entities until all run-items have a meaningful and nicely readable BIDS output name. The (saved) bidsmap.yaml output file will be used by the bidscoiner to do the conversion of the source data to BIDS.
You can hoover with your mouse over items to get help text (pop-up tooltips).
Here is how to run the bidseditor command:
usage: bidseditor [-h] [-b NAME] [-t NAME] bidsfolder
positional arguments:
  bidsfolder            The destination folder with the (future) bids data
More details…
- options:
- -h, --help
show this help message and exit
- -b, --bidsmap NAME
The study bidsmap file with the mapping heuristics. If the bidsmap filename is just the base name (i.e. no “/” in the name) then it is assumed to be located in the current directory or in bidsfolder/code/bidscoin. Default: bidsmap.yaml
- -t, --template NAME
The template bidsmap file with the default heuristics (this could be provided by your institute). If the bidsmap filename is just the base name (i.e. no “/” in the name) then it is assumed to be located in the bidscoin config folder. Default: bidsmap_dccn
examples:
  bidseditor myproject/bids
  bidseditor myproject/bids -t bidsmap_dccn.yaml
  bidseditor myproject/bids -b my/custom/bidsmap.yaml
Main window
As shown below, the main window of the bidseditor opens with separate tabs for every data format present in the bidsmap (here DICOM mappings and PAR mappings). The tabs always consist of a Participant data table and a Representative samples table:
The participant table specifies how to populate the participants.tsv file and its json sidecar-file. In the (default) DCCN template bidsmap, the participant table contains the
participant_idandsession_idkeys, with their dynamic<<filepath:regex>>values for extracting the subject/session labels from the path of the source data. You should edit these value if your file paths have a different format, or if your subject and session labels are stored in a different way, e.g. use<<PatientName>>if you have DICOM data that uses this field. Clear thesessionlabel field if you have data with only one session. This will remove the optional session label from the table and BIDS output names. The remaining rows are used to populate theparticipants.tsvfile. To delete rows remove the value in the first column, to add a row, enter values in the empty bottom row. Append a special<<session_id>>tag to a key if its value changes between sessions (e.g.agein longitudinal studies) – this tag will be supplanted with the extractedsession_idlabel during bidscoiner runtime.The samples table shows a list of input files (left side) that uniquely represent all the different data types in the sourcedata repository, as well as their
BIDS outputnames (right side). The BIDS output names are shown in red if they are not BIDS compliant, crossed-out gray when the runs will be ignored/skipped in the conversion to BIDS, otherwise it is colored green.
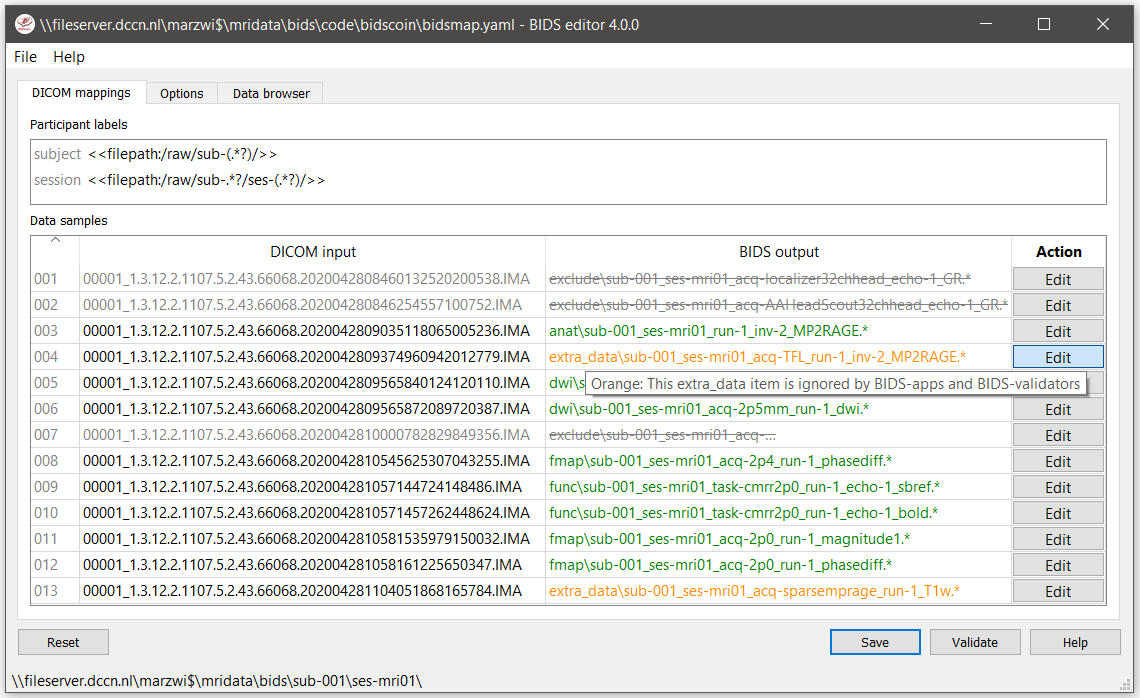
The main window with a DICOM mappings tab, a Presentation mappings tab, an Options tab and a Data browser tab. The selected DICOM mappings tab shows an overview of how DICOM source data types (left) are mapped to BIDS output data (right). Note the use of colors of the output names and the associated pop-up help window that emerges when hoovering the mouse. The BIDScoin settings used for this study can be adjusted in the Options tab and the Data browser tab can be used to inspect the source data structure.
Tip
If your participant_id/session_id filepath regular expression fails to parse the subject or session label, try prepending (a part of) the sourcefolder path, e.g. if your data is in /project/sourcedata/s001/.. and your subject prefix is s, try <<filepath:/sourcedata/s(.*?)/>> for extracting the 001 subject label. This is especially important if your subject folders have no or a very short prefix.
Tip
You can compare, edit or add multiple run-items by selecting and right-clicking BIDS output names (use shift-/control-click to select multiple run-items). Unlike regular run-items, added run-items are specific to single data sources and can be used to handle data acquisition exceptions (see the troubleshooting guide for more info)
Edit window
In the main window, you can double-click the BIDS output name of a data sample or click the [Edit] button next to it (NB: the * in this button indicates that attention is required) to open a new window, as shown below. In this new window, the full bids-mapping info of the clicked data-sample (AKA run-item) is shown, with the filesystem Properties and file Attributes input on the left, and, most importantly, the associated BIDS Data type, Filename and Metadata output on the right.
Editing the properties and attributes is usually not necessary and considered advanced usage, so you can focus on the BIDS output tables on the right. You should first make sure the BIDS Data type (drop down menu) and its suffix label (drop down menu) are set correctly, and then you should edit the (automatically generated) BIDS values that you think are not optimal or incorrect (double-click the cell). Each time an item is edited, a new Data filename preview is shown (green or red text indicates that the name is BIDS compliant or not). If you have a single run, then you can delete the run-index, else it will be automatically incremented (see here for more explanation). In the Metadata table (see the figure below) you can enter key-value pairs that you like to be stored as BIDS metadata in the json sidecar file. Right-clicking the meta table allows you to import metadata from JSON/YAML/CSV/TSV files on disk. If you are editing a field map, then see the bidsmap explained field map sections for more information.
If the preview of the BIDS filename and metadata look correct, click the [OK] button to save it. All data of this type is now going to be converted in the same way.
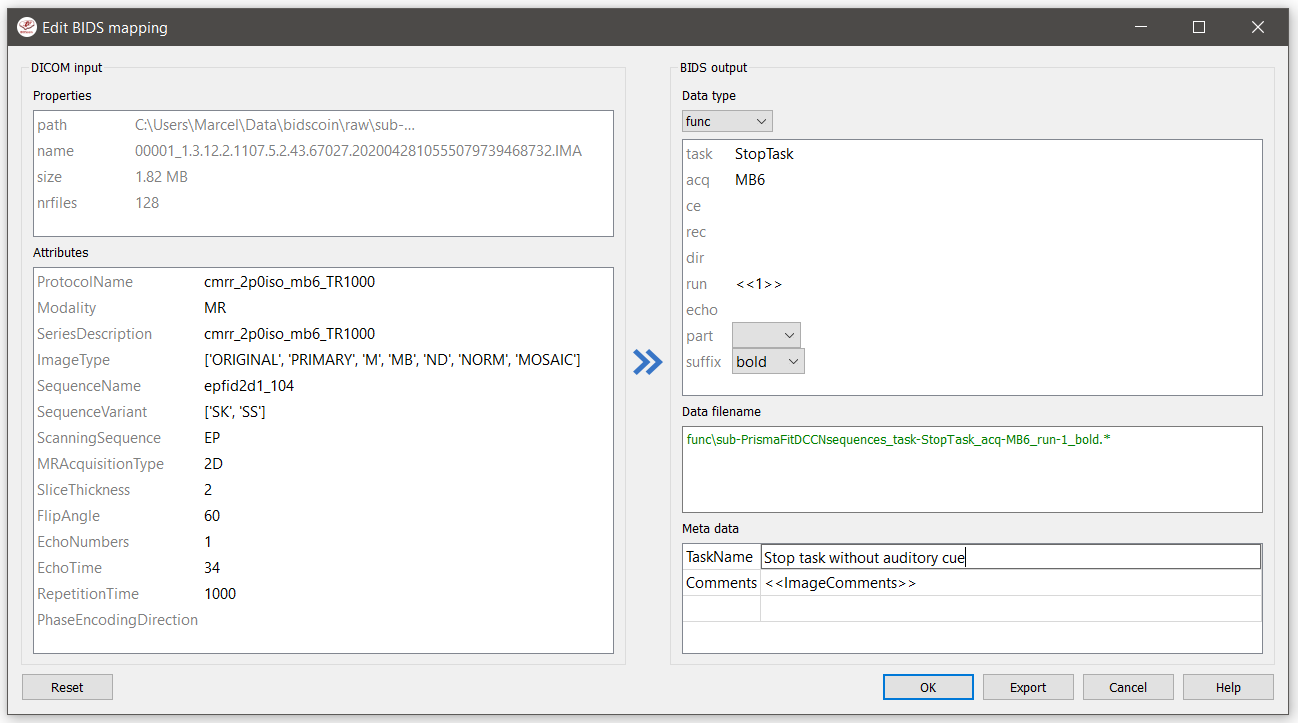
The edit window for customizing a bidsmap run item, featuring the DICOM attributes mapped onto BIDS values and (dynamic) metadata values (e.g. Comments). BIDS values that are restricted to a limited set are presented with a drop-down menu.
Finally, if all BIDS output names in the main window look correct, click the [Save] button and proceed to step 2 by running the bidscoiner tool. Keep in mind that re-running bidsmapper or bidseditor is always safe, as these tools simply reuse the existing bidsmap file without modifying or deleting any other files on disk.
Stimulus events
If your dataset contain behavioural/stimulus presentation logfiles and you are using e.g. the events2bids plugin to convert them to BIDS events, you will get a Presentation, PsychoPy and/or a generic Logdata tab in the main window. If you open a run-items in there, you will get the same edit window as explained before, except that an extra BIDS output data table is appended on the right side. This table provides a preview of your log data after conversion to BIDS. Click on the Edit button next to the output table to adjust its content to your needs.
More details…
The edit window displays the parsed input data on the left, BIDS conversion settings in the center, and a preview of the BIDS output on the right.
Left panel: Configure how your raw log files are transformed into a tabular format, which is then processed using the settings from the center panel.
For Presentation log files, you can select from the drop-down menu which table within your log file to use.
For PsychoPy log files, you can select from the drop-down menu whether to use the raw long-wide data, or to use a pivoted version in which all
.startedand.stoppedtimestamps are stored in theonset,duration, andevent_typecolumns.Additionally, for PsychoPy, you can specify values for
add_startedandexpandas regex patterns to select relevant input columns.add_started columns: The corresponding
.startedtimes will be added to these columns. This is useful for converting relative times (e.g.,.rtreaction times) into absolute timestamps.expand columns: If a column contains list data (e.g.,
"['0', '2.1', '4.2']"), it will be split into multiple new columns. These expanded columns are assumed to store time onsets and will be included when pivoting the data.
Center panel: Define the mapping parameters that transform the input table (left panel) into the output table (right panel). The mapping parameters are organized into three tables:
‘Columns’ table – Specifies which input column names are included (left) and how they should be named in the output table (right). You can add, edit, and remove column names as needed.
‘Rows’ table – Specifies which input rows are included in the output table. A condition (left) is a dictionary where column names serve as keys and values as regular expression patterns. Rows are included if the pattern matches a column value, i.e. when a specific experimental condition is met.
Within a condition, patterns act as AND operators, meaning that the more patterns you add to the dictionary, the fewer rows are included in the output.
Between conditions, they act as OR operators, meaning that adding more conditions increases the number of included rows.
The ‘output column’ is optional and can be used, for example, to create new output columns or contrast regressors for a design matrix (see the screenshot below).
‘Timing’ table – Contains settings for converting input time values to BIDS-compliant output values:
columns – A list of input column names that contain time values.
units/sec – The number of time units per second in the source data (e.g., 10000 for clock times with a precision of 0.1 milliseconds).
start – A dictionary specifying column names and event codes that define the start of the run (time zero), such as the column name and event code that log scanner pulses.

Edit window for converting Presentation log data to BIDS output. Note that, since the first row condition uses the non-selective matching pattern .*, all input rows are included. Additionally, for selected rows, each of the two subsequent conditions adds data (“go” and “stop”) to the new task output column.
Adjust the mapping tables until the transformation is correct, then click on “Done”.
Tip
The BIDScoin GUI provides several tools to help you set the correct values:
Double-click an input filename to open an inspection window displaying the full header information—useful for checking attributes not (yet) included in your bidsmap.
Hover over a cell to see a tooltip with additional background information, such as details from the BIDS specifications.
Check the terminal output to ensure there are no warnings or errors. A summary of any issues is printed when you exit the application.
Step 2: Running the bidscoiner
Converts (“coins”) your source datasets to NIfTI/json/tsv BIDS datasets using the mapping information from the bidsmap.yaml file. Edit this bidsmap to your needs using the bidseditor tool before running bidscoiner or (re-)run the bidsmapper whenever you encounter unexpected data. You can run bidscoiner after all data has been collected, or run/re-run it whenever new data has been added to your source folder (presuming the scan protocol has not changed). Also, if you delete a subject/session folder from the bidsfolder, it will simply be re-created from the sourcefolder the next time you run the bidscoiner.
The bidscoiner uses plugins, as stored in the bidsmap[‘Options’], to do the actual work
Provenance information, warnings and error messages are stored in the bidsfolder/code/bidscoin/bidscoiner.log file.
Here is how to run the bidscoiner command:
usage: bidscoiner [-h] [-p LABEL [LABEL ...]] [-b NAME] [-f] [-c [SPECS]] sourcefolder bidsfolder
positional arguments:
  sourcefolder          The study root folder containing the raw source data
  bidsfolder            The destination/output folder with the bids data
More details…
- options:
- -h, --help
show this help message and exit
- -p, –participant LABEL [LABEL …]
Space separated list of selected sub-# names/folders to be processed (the sub-prefix can be omitted). Otherwise all subjects in the sourcefolder will be processed
- -b, --bidsmap NAME
The study bidsmap file with the mapping heuristics. If the bidsmap filename is just the base name (i.e. no “/” in the name) then it is assumed to be located in the current directory or in bidsfolder/code/bidscoin. Default: bidsmap.yaml
- -f, --force
Process all subjects, regardless of existing subject folders in the bidsfolder. Otherwise these subject folders will be skipped
- -c, –cluster [SPECS] Use the DRMAA library to submit the bidscoiner jobs to a high-performance
compute (HPC) cluster. You can add an opaque DRMAA argument with native specifications for your HPC resource manager (NB: Use quotes and include at least one space character to prevent premature parsing – see examples)
examples:
  bidscoiner myproject/raw myproject/bids
  bidscoiner -f myproject/raw myproject/bids -p sub-009 sub-030
  bidscoiner -f myproject/raw myproject/bids -c "--time=00:30:00 --mem=4000"
Tip
Always check the terminal output for possible warnings or errors (a summary of them is printed at the end)
Check your json sidecar files of your field maps, in particular see if they have the expected
IntendedFor/B0FieldIdentifiervalues
Note
The provenance of the produced BIDS data-sets is stored in the
[bidsfolder]/code/bidscoin/bidscoiner.logfile. This file is also very useful for debugging/tracking down bidscoin issuesPrivacy-sensitive source data samples may be stored in
[bidsfolder]/code/bidscoin/provenance(see the-soption in the bidsmapper)Small anonymized data snippets are send to the BIDScoin developers to generate usage and error statistics. For more information and opt-out run
bidscoin --tracking show
Finishing up
After a successful run of bidscoiner, the work to convert your data in a fully compliant BIDS dataset is usually not fully over and, depending on the complexity of your data-set, additional tools may need to be run to post-process (e.g. deface) your data or convert data types not supported by the standard BIDScoin plugins (e.g. EEG data). BIDScoin comes with some bidsapps that can help you finishing up your bids data repository.
Adding more metadata
To make your dataset reproducible and shareable, you should add study-level metadata in the modality agnostic BIDS files (BIDScoin saves stub versions of them). For instance, you should update the content of the dataset_description.json and README files in your bids folder, or you may provide a *_sessions.tsv file (see the BIDS specification for more information). Moreover, if you have behavioural log-files other than from NeuroBS, then you have to converting these into BIDS compliant *_events.tsv/json files yourself (but you are encouraged to look at the plug-in API and write their own log-file parser).
BIDS validation
If all of the above work is done, you can (and should) run the web-based BIDS Validator to check for inconsistencies or missing files in your bids data-set (NB: the BIDS Validator also exists as a command-line tool).